
Brush Designer
Brush Designer is a free official plugin for making your own brushes. A brush is a small picture: you draw it pixel by pixel, try it on a test box, and save it. Saved brushes show up in the Brush tab of the Asset Shelf next to the ones that come with Pixel Painter.
Get it
Section titled “Get it”Brush Designer is a free DLC on Steam. See Install or remove an official plugin. Then open it from Plugins > Brush Designer.
Make a brush
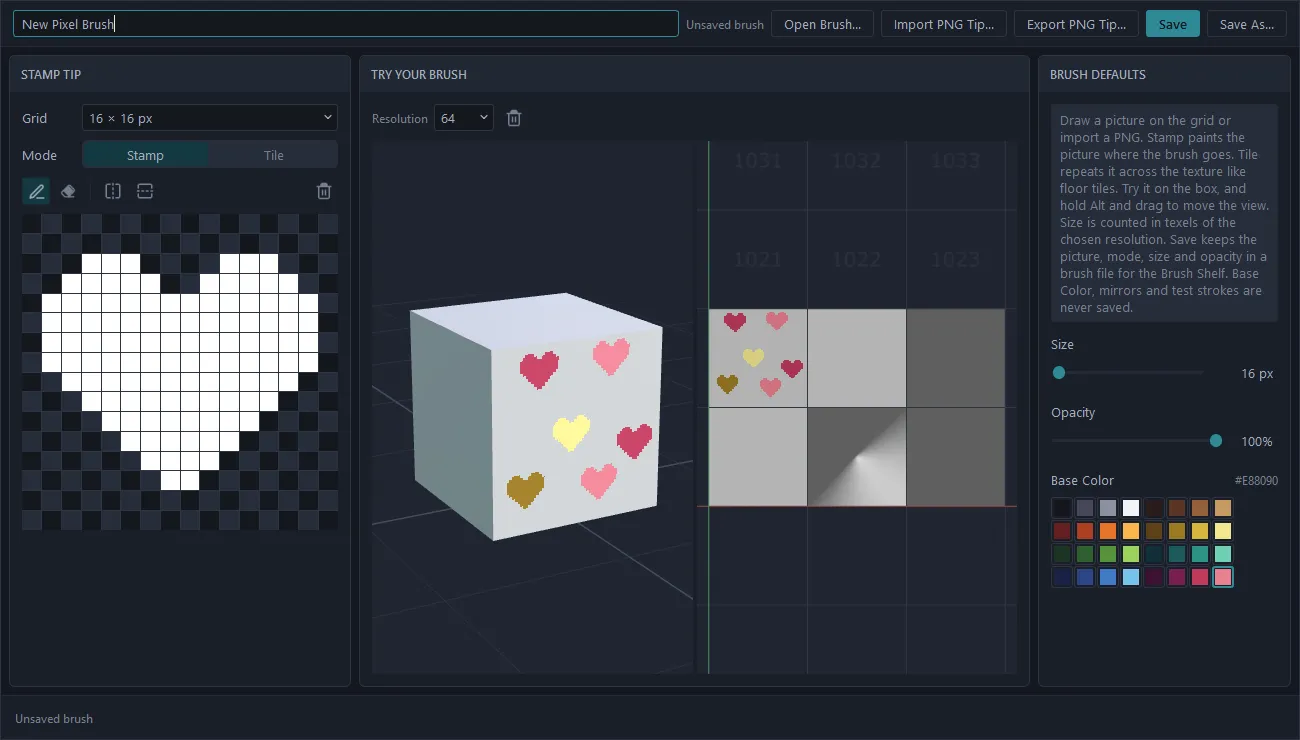
Section titled “Make a brush”The window has three columns.
Stamp tip (left) is where you draw.
- Grid - the size of the picture, from 2 x 2 to 32 x 32 pixels.
- Mode - Stamp paints the picture wherever the brush goes. Tile repeats it across the texture like floor tiles, so you can paint a pattern on.
- Pencil and Eraser draw on the grid. Mirror left-right and Mirror top-bottom copy each pixel to the other side (turn both on to paint all four corners at once; red lines show the mirror axes). Clear tip starts over.
Filled pixels are ink, empty ones are not. Painting with the brush uses whatever colour you have picked in the app, so draw the shape, not the colours. An imported PNG works the same way: anything solid becomes ink.
Try your brush (middle) is a test box in a small 3D view and UV view. Paint on either one. Hold Alt and drag to move around, the same as the main viewport. Resolution sets the box’s texture size, and the bin icon wipes your test strokes. They never touch your project.
Brush defaults (right) are saved with the brush:
- Size - in texels of the texture you paint on. For a Stamp it follows the picture: change the grid, import a PNG or switch the mode to Stamp, and Size becomes the picture’s longest side, so every pixel you drew lands on one texel. You can still change it afterwards, and opening a saved brush keeps its own Size. For a Tile brush, Size is how wide an area one dab covers.
- Opacity.
- Base Color is only for testing on the box. It is not saved.
Save and edit
Section titled “Save and edit”The buttons along the top:
- Add to Shelf saves a new brush as a
.pbrushfile inDocuments\PixelPainter\assets\brushes, and it appears in the Asset Shelf straight away. Name the brush first; the name is how it shows on the shelf. Saved somewhere else, the file works but the shelf does not list it. - Update on Shelf takes its place once the brush is saved, and writes your changes over it. Rename the brush and the button adds a new one instead, so the old brush stays as it was.
- Edit Shelf Brush… opens a brush you made to change it. The six brushes that come with the app are built in, not pictures, so they cannot be opened here, and a new brush cannot take one of their names.
- Import PNG… and Export PNG… load and save the picture itself.