
Layers
Layers work like they do in most painting apps. The layer at the top covers the ones below it, and you can hide, reorder or delete any of them without losing the rest.
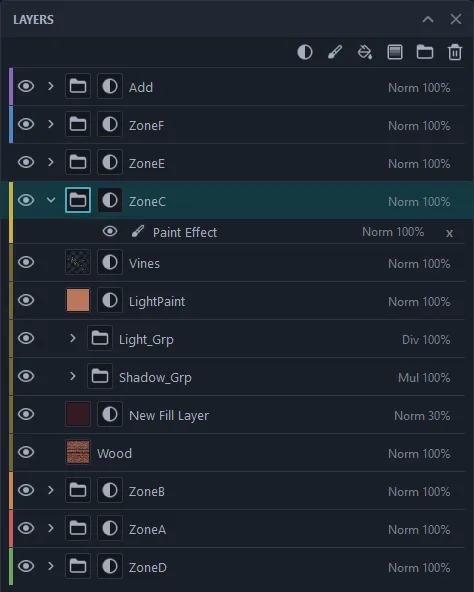
Adding layers
Section titled “Adding layers”The buttons along the top of the panel, from left to right:
- Add mask - adds a mask to the selected layer (more on masks below)
- Add paint layer - an empty layer to paint on
- Add fill layer - one flat value for the whole layer, for every channel
- Add gradient map layer - colours the layer through a palette ramp, driven by its mask
- Add group - a folder to keep related layers together
- Delete selected layer
Dropping a material from the Asset Shelf also adds a layer. It is a fill layer whose content comes from the material’s settings.
Each row
Section titled “Each row”- The eye shows or hides the layer.
- The name can be renamed by double-clicking it.
- On the right you see the blend mode and opacity, for example
Norm 100%.
Select a layer to change its Blend mode and Opacity in the Properties panel. The blend modes are Normal, Multiply, Divide, Screen, Add, Subtract, Lighten and Darken.
Right-click menu
Section titled “Right-click menu”Right-click a layer for more:
- Colour - tags the layer with a colour (Red, Orange, Yellow, Green, Blue, Purple or Gray). It shows as a strip on the left of the row. It is only there to help you find things in a long stack. It never changes the texture.
- Copy Layer and Paste Layer - copy a layer and paste it into the same texture set or a different one. Use this to reuse a detail on another part of the model, or to duplicate a layer.
- Paint Mirror - copies one half of the painting onto the other half.
+X to -Xkeeps the +X side and overwrites the -X side. This is how you fix a layer you painted with symmetry off. - Paint Flip - reflects the whole painting across X, Y or Z.
- Mask - everything to do with masks (see below).
Paint Mirror and Paint Flip work on what was painted by hand: a paint layer, or a mask’s paint effect when that effect is selected in the list.
A mask decides where a layer shows. Add one with the mask button at the top of the panel, or from Mask > Add Mask in the right-click menu.
The mask can be painted by hand, or built from effects that you add from the same Mask menu:
- Paint and Fill - paint the mask yourself, or fill it with one value
- Light - lit from one direction, like light falling on the model
- AO - collects in corners and crevices
- Curvature - picks out edges and dents
- Position - a gradient along one axis, for example fading out towards the feet
- Pattern - a checker, random or brick pattern
Light, AO, Curvature and Position are worked out from the mesh maps, so bake those first in Bake mode. Pattern needs nothing baked. A common use: put a dirt layer on top and mask it with AO, so the dirt only collects in the corners.
Ctrl+Z undoes and Ctrl+Shift+Z (or Ctrl+Y) redoes. The Edit menu shows the name of the step it will undo next.